Hey @pathare,
I had a look at the hatch design, and there are a few things that can be done to significantly speed up the print time. The image below highlights the root of the issue:
As you can see, each individual trace in the hatch plane is composed of two 'passes', and the borders are 3. The V-One software will split traces any time two features larger than one pass each overlap - this is done to prevent ink wastage and prevent pooling when two large traces (or a pad and a large trace, or a pad with thermals) overlap in the design.
In most designs, trace splitting will reduce the total print time - unfortunately, in this case, it does the opposite, due to the unintended consequence of producing a ton of small lines. Small lines take up the most time when printing, which is a bit counterintuitive - suffice to say that most of the time in a print is actually terminating, raising and moving between features, rather than printing.
Luckily, you can drastically reduce the print time for this case with a few tweaks on either the design side or on the V-One software side. Both approaches reduce the hatch plane so that it is composed only of single-pass traces.
V-One Software Workaround:
If you have no way to adjust your gerbers, you'll need to make use of selective printing in the PRINT step:
- First, highlight and print everything except the hatch planes. This should take only a few minutes.
- Once the print completes, open the settings window by clicking the gear icon in the top right corner of the app.
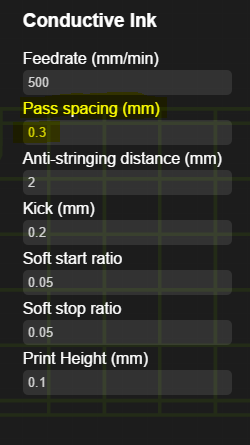
- From here, have a look at the 'Pass Spacing' parameter in the Conductive ink column. This setting adjusts the minimum distance between two adjacent 'passes' that make up a feature - for example, if you have a trace that is 0.4mm wide, and pass spacing is set to 0.18mm (the default), your trace can fit 2 passes. However, if pass spacing is set to 0.3mm, you'll only get one.

4. Increase the pass spacing until all the hatch lines are single-pass traces. For this case, I found that 0.3mm worked just fine (see below). When you save settings, the preview will reload - it should only take a few seconds.
5. All that's left is to selectively print the hatch plane. With these settings, the entire hatch takes 21 minutes to complete.
Design Adjustment: If you can edit your design, this is the way to go. All you need to do is to reduce the trace width of the hatch. Your CAD tool should list this as an adjustable parameter. You want to reduce the hatch width so that it is less than 0.36mm / 14mil (aka less than 2 times the default pass spacing (0.18mm). This way, the majority of the traces in the hatch won't be subject to trace splitting, which will drastically reduce print time.
Note: Both of these approaches will also reduce the density of conductor within a certain area, since there are now less passes. If you need a denser hatch, you can reduce the spacing parameter of the hatch - as long as your trace widths are low, this should still go much faster than what you started with.
Hopefully, these guidelines will be helpful for future designs. If you have any questions, just let me know.