Hey everybody!
To complement the launch of the V-One Drill, version 1.0.0 of the software has been released, it includes plenty of changes that will benefit all V-One users. Read on to learn more!
The Drill Procedure
We are excited to add a brand new drilling procedure. Just like the other procedures, the drill workflow will guide the user every step of the way and includes plenty of pictures and videos.
We have changed our recommended procedure for double sided circuits. The new procedure is:
- Drill the first layer
- Print & bake the first layer
- Print & bake the bottom layer
- Use rivets to connect the top and bottom layers.
Don’t worry - if you don’t have the V-One Drill, you can still use rivets to make vias or through hole connections. We offer them as single items in our store. Over the next couple of days we’ll be updating our documentation to reflect this.
“My probe fell in a hole” - said everyone
The situation is familiar - you are trying to probe a board that has holes (either printing a double sided board or dispensing paste on a fabbed board) when all of a sudden the probe falls into a hole.
In the best case scenario, the probe trips on a hole by detaching itself from the carriage and the V-One stops safely. In the worse case scenario, the probe tip wrecks havoc on your board & scratches it up. Both options suck and can lead to broken nozzles if not detected.
Before the v1.0.0 release, the algorithm to determine probe points loosely speaking was as follows:
- The Software picked a set of points on the board for the Probe
- The Probe hoped one of those points wasn’t a hole.
- The V-One would start probing, and the Probe would fall in a hole.

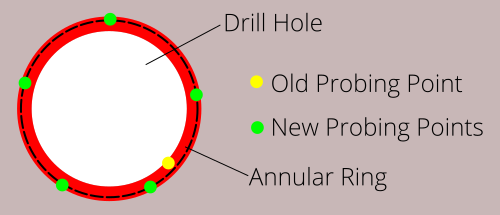
With version 1.0.0, we have added some smarts to the probing algorithm. First, the software will try to avoid picking holes in the first place. Second, if there are still vias / through-holes that need to be probed, the system will measure a couple of points around the perimeter that are 250 microns away from the diameter of the hole.
Take a look at the picture below. Before, the old probing point (yellow) would be far too close to the edge of the hole and could easily fall in, moreover, we did not have any nearby points we could fallback to.
Now we will probe a couple of points (green), and if one of them falls in a hole it will be detected and discarded. To be extra safe, the probe will raise all the way for the first 3 points as it determines what a safe raise height is.

The result? The total probing time will be a bit longer, but your probe and nozzles will be safe. Please thank @troy for making this happen!
Measure Once, Align Twice
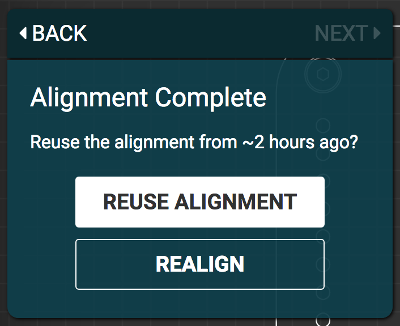
Once you have completed an alignment procedure (teaching it 2 pads), the software will now remember the position of your board. Later, if you need to realign the same circuit, the software will ask if you want to keep your old alignment. Of course, this only works if you do not move the board between alignments.

Why is this useful? Two key reasons:
- When switching from one workflow to the other. i.e - Drilling into Printing.
- If your job is interrupted by a meeting or lunch, or if the app crashes and you have to reboot - you can jump back into it.
Interface Update
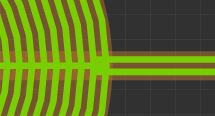
A ‘raw’ version of the Gerber file will now be shown behind the toolpaths, it is the faint copper outline seen below. By overlaying the v-one toolpaths on the raw Gerbers it will make debugging file loading issues a bit easier. Problematic geometries should become evident.

That’s it for now - let us know what you think!